In the fast-paced and demanding world we live in, finding a balance between excelling at work and nurturing a fulfilling personal life is a constant challenge. In recent weeks, I have found myself facing a new reality with the welcome of my newborn daughter. The delicate equilibrium between professional success and personal well-being is crucial for a wholesome life. The question for me: how do I continue to function at my highest, going above and beyond as a leader, whilst being present both physically and mentally to be the role model and support my family deserve?
The Juggling Act: Work and Home
Modern life often necessitates juggling multiple roles, with work and home being two major spheres that demand our attention. Achieving excellence in both areas seems impossible but I believe the notion to strive for it perpetuates the drive. There will be feeling of guilt and grief for the life you once had before, whether that be the time you had available in some areas, but it doesn’t mean you have to be less effective in them.
I strongly believe that success in both realms of work and home innately impact the other. The skills of organisation, self-reflection, attention to detail, routines, positivity, responsibility etc. are all directly transferable.
Professional Success
If you ever needed to justify it to yourself (not that you do), exploring through a “personal” lens, investing in work can allow you to understand more about your potential; face challenges you didn’t know you could face; develop communication with people with different perspectives and beliefs, as well as taking comfort in hearing other people’s plights and the solutions they found.
A fulfilling career brings not just financial stability but also a sense of accomplishment and personal growth. Striving to be your best at work involves setting goals, continuously improving your skills, and maintaining a strong work ethic. However, the pursuit of professional success should not come at the expense of your personal life.
Personal Well-being
Being your best at home also involves fostering meaningful relationships, maintaining a healthy lifestyle, and pursuing personal interests. Neglecting these aspects can lead to burnout, strained relationships, and a diminished sense of self. It’s vital to recognize the importance of self-care and allocate time for relaxation and rejuvenation. Exploring the impact through a “work” lens, investing in one’s personal life means you develop stronger communication skills, the ability to recharge emotionally and mentally; investing in your own wellbeing allows you to better find physiologically balance to face the demands that wait ahead.
The Interconnected Nature of Life
All in all, recognising the interconnected nature of work and home life is pivotal. A successful professional life can positively impact personal well-being by providing resources and opportunities for personal growth. Conversely, a fulfilling personal life can enhance job satisfaction and productivity by fostering a healthy mindset and strong support system.
Strategies for Balancing it All!
Set Clear Boundaries: Establish boundaries between work and home life to avoid overextending yourself in either domain. This could involve setting specific work hours, avoiding work-related activities during personal time, and vice versa. Speak with your loved ones and work together in what realistic balance you can strike – it may be that some days you work longer and others you don’t. That way your family are also able to help fill the times they aren’t expecting you back.
Prioritise and Delegate: Identify priorities in both work and personal life, and delegate tasks when possible. Efficient time management ensures that you focus on what truly matters in each aspect of your life. Don’t feel bad for apologising for needing to cut the end-of-the-day conversations short so that you can finish your task – communicate and explain this and I am sure your colleagues will understand.
Practise Mindfulness: Cultivate mindfulness to be fully present in the moment, whether at work or at home. This helps reduce stress and enhances your ability to perform optimally in both spheres. If you know you have a meeting, always add on an extra 10 minutes to give you that time to breathe and reflect. This helps manage what’s on your mind minimising it all building up for when you head home.
Regular Reflection: Take time to reflect on your goals and priorities regularly. Adjustments may be necessary as circumstances change, ensuring that your efforts align with your evolving aspirations. Don’t be ashamed if changes do need to happen. Being open and honest is crucial. Talk to others about their experiences – you’ll be surprised how many people are facing a similar experience.
Don’t be so hard on yourself!
Striking a balance between being your best at work and at home is an ongoing process that requires mindfulness, intentionality, and adaptability. By acknowledging the interconnectedness of these two aspects of life and implementing effective strategies, you can lead a fulfilling and successful life that encompasses both professional achievement and personal well-being. Remember, the key lies in finding harmony, not perfection.
Leadership is a multifaceted role that significantly influences the culture and dynamics of a team. In the initial stages of a leadership team being understood, their functionality as a team, their unity and their consistency are all being assessed – people want to know if they can trust their leadership team to steer them in the right direction. One crucial aspect of effective leadership is how individuals handle negativity within their teams. It is crucial to have a secure, solid culture being modelled routinely by all, so when it comes to managing negativity, a leader needs to be aware of three things: an Absorber, an Enabler, or a Fueler.
The Absorber
The Absorber is a leader who possesses the ability to absorb negativity for the greater good of the team and its culture. This leader is resilient and understands that challenges are inevitable. Instead of deflecting blame or passing on negativity, the Absorber takes it upon themselves to shield their team members from unnecessary stress. By doing so, they create a positive environment where team members feel supported and motivated to overcome obstacles. The Absorber listens and then helps navigate to the root of the concerns, offering advice, positivity and constructive next steps.
With leaders like this, it’s fundamental to have a support mechanism within the leadership team that allow all to carefully offload the absorption, dealing with anything significant strategically.
The Enabler
Moving along the spectrum is the Enabler, a leader who, consciously or unconsciously, allows negativity to persist within the team. This leader may be passive in addressing conflicts, turning a blind eye to toxic behavior, or avoiding difficult conversations. While the Enabler may believe they are maintaining a semblance of peace, their lack of intervention can lead to a toxic work environment. Over time, this may erode trust and collaboration among team members, hindering overall productivity and success. This significantly compromises the integrity of leadership and creates chinks in the armour.
The Fueler
And at the complete opposite end of the spectrum, The Fueler represents the toxic side of leadership, actively contributing to negativity within the team. This leader may engage in gossip, foster a culture of blame, or intentionally create divisions among team members. This is not always done with the intent to target leaders but a shallow, misguided way of trying to relate or connect. This is a false correlation of connecting with the view they’ll be more favoured, listen to and in turn, respected. But in truth, by dropping such standards results in jeopardy for this supposed professional. The Fueler not only damages the team’s morale but also tarnishes its long-term success. Their actions can lead to increased turnover, decreased productivity, and a general sense of discontent among team members.
Effective leadership involves proactivity and the delicate task of managing negativity when it arises within a team. The Absorber, the Enabler, and the Fueler represent three distinct approaches to handling challenges and conflicts. Leaders who absorb negativity foster a positive culture, while enablers risk allowing toxicity to fester. Fuelers, on the other hand, actively contribute to a detrimental work environment. Recognising and understanding these attributes can help individuals develop the self-awareness necessary to cultivate positive leadership qualities and contribute to the success of their teams.
In the ever-evolving landscape of education, the importance of an optimal learning environment cannot be overstated. It’s not just about what children are learning, but also about how they are learning. In recent years, it has become evident the benefits of adopting a “less-is-better” approach in the classroom environment. It emphasises simplicity, minimalism, and reduction of extraneous elements, leading to improved focus, culture (behaviour), and overall learning outcomes. In preparing classrooms (particularly over the summer period), or any environments where focus and attention is required for different elements and contexts, it has to be questioned whether the time and effort spent on designing and creating different displays and workstations are actually necessary for learning to happen. Let’s delve into the various aspects of why less is better in the environment for learning and how it positively impacts both pupils and teachers, while also recognising the value of effective working walls in capturing and displaying learning over time.
Reducing Extraneous Load:
Extraneous load refers to any cognitive load that doesn’t directly contribute to the learning process. A cluttered and visually overwhelming classroom environment can create unnecessary distractions, leading to increased cognitive load (the learner have to use precious working memory in deciphering what information is needed). By adopting a minimalist approach, teachers can remove these distractions and allow children to focus their cognitive resources on the core content. This reduction in extraneous load helps streamline the learning process, helps to promote intrinsic load, making learning more efficient and effective.
Improved Behaviour and Culture:
A clutter-free and organised classroom environment sets the tone for a positive learning culture. When students are surrounded by clean, purposeful, and intentional spaces, they are more likely to adopt better behaviour and a heightened sense of responsibility. Moreover, a simple environment fosters a sense of calm and tranquility, which can contribute to a more harmonious classroom atmosphere. For anyone struggling with processing or is more sensitive to stimuli, a simple environment reduces this constraint and supports them to feel more comfortable with their surroundings. Pupils are more likely to respect their surroundings and each other when the environment promotes a sense of order and purpose.
Enhanced Student Focus and Attention:
Visual clutter and excessive stimuli can overwhelm children’s senses and divert their attention away from the lesson at hand. By embracing a minimalist classroom design, teachers can create an environment that directs children’s focus towards the key instructional elements. This leads to increased engagement, improved concentration, and ultimately, better retention of information. This helps when instructing as you are able to guide them from afar to the clear knowledge displayed e.g. a worked example. A clean and uncluttered environment helps students stay on track and actively participate in the learning process.
Lightening the Teacher Workload:
Teachers often invest a significant amount of time and effort in creating elaborate displays, noticeboards and decorations. While these may seem appealing, they can also contribute to visual clutter that distracts students and consumes valuable teaching time. Embracing minimalism allows teachers to reduce the time spent on creating elaborate displays, freeing them up to focus on more impactful teaching strategies and individualised student support. Overtime, once children are familiar with their surroundings, they can take charge of some of the key notices and information if it is needed to be displayed e.g. visual timetables; reminders; declarative information.
Effective Use of Visualisers:
Visualisers are powerful tools that allow teachers to live-model, project images, work, and objects onto a screen for the entire class to see. However, the effectiveness of visualisers can be compromised if the classroom environment is visually overwhelming. By prioritising simplicity, teachers can ensure that the attention of both the students and the teacher remains on the content being presented, rather than being dispersed among various distractions – this can include you being the distraction too!
The Role of Working Walls:
While simplicity is crucial, it’s also important to recognise the value of working walls in capturing and displaying learning over time. Working walls, when thoughtfully organised and maintained, serve as dynamic visual representations of children’s progress and the ongoing learning journey. Instead of overwhelming the classroom with a multitude of displays, effective working walls provide a focused space where students can revisit, reflect upon, and build upon their learning. It is even more purposeful when they are created with the learners as they understand the narrative during its creation which aids retrieval.
Conclusion:
The “less-is-better” approach in the classroom environment, coupled with the strategic use of effective working walls, has proven to be a transformative paradigm shift in schools. However, clutter and pre-populated displays still exist in some schools today. By prioritizing simplicity, teachers can reduce extraneous load, improve classroom culture, enhance focus and attention, and lighten their own workload. At the same time, working walls play a crucial role in capturing and showcasing learning over time, creating a balanced and purposeful classroom environment. As we navigate the complex landscape of education, embracing minimalism and leveraging working walls paves the way for a more effective and impactful teaching and learning experience, allowing more time to focus on the some-what complex delivery of novel information.
As the school year nears its end, we all find ourselves juggling a multitude of tasks while striving to maintain student engagement and create a smooth transition into the summer break. The summer term is a tough one as not only are we wrapping up the projects and meeting termly deadlines, but we’re also trying to wrap up the year’s targets and pave the path for next year. These last few weeks present an opportunity to reflect on the accomplishments and challenges of the academic year and set the stage for a positive academic finale.
Reflect on the Journey: Take a moment to review the academic year and reflect on the growth and achievements of both you and your pupils. Celebrate the successes, identify areas for improvement, and cherish the memories created together. There are many challenges that push us and often make us question “Was it as hard as this last year?” But take the time to recognise the strength and skills learned and obtained by this and explore what you can either apply or do differently next time.
Set Clear Goals: This brings me nicely onto this – setting goals. Having goals help give meaning to what we do, whether that be to better yourself, find a new balance or a new challenge. They are often underpinned by our core values so make sure you take some time to review these – it can be a great mental reset when gaining perspective for the year ahead. Establish specific learning objectives or goals (for you and your pupils) for the remaining weeks. Prioritise essential content or skills that need reinforcement and communicate these goals to your pupils and line manager. Clear expectations provide direction and focus.
Engage in Meaningful Activities: Plan engaging activities that review important concepts while keeping students motivated. This could be reviewing the class code of conduct, reviewing the importance of positive culture and togetherness; or something larger like reviewing the learning journey and what they have obtained holistically I.e. their own personal development; achieving the PSHE strands; retrieving key learning facts and materials from differing subjects. This could be done through project-based learning, group activities, or hands-on experiences that connect learning to real-world scenarios. These activities make learning meaningful and memorable.
Celebrate Accomplishments: Take the time to acknowledge and celebrate the accomplishments of your students. Recognise academic achievements, personal growth, or positive contributions to the classroom community. Encourage a sense of pride and accomplishment, perhaps working towards a presentation, play or a simple letter to their parents that encourage pupils to articulate their journey. For you, create a culture where you and colleagues are sharing success and how you overcame some of the challenges this year. Some schools have staff awards that are nominated from staff members which can be truly heartfelt and thankful – you’d be surprised at what your colleagues have noticed and are grateful for.
Foster Reflection: Provide opportunities for students to reflect on their learning journey and set goals for the future. Reflective activities promote self-awareness and ownership of learning. Help students recognise their progress and inspire them to strive for continuous growth. This could be through a number of retrieval activities, ranging from academic cues (declarative knowledge) as well as social and personal development cues. Class discussions can be really powerful with this and if done well, can foster a culture of support and praise from other pupils to each other.
Complete Assessments: Reports are either completed or underway. Ensure you have administered and analysed the latest assessments. Be clear with their next steps and provisions needed so that the children get a smooth transition that minimises lost opportunities for learning. But also think outside the academic success and take time to explore the strengths of every child this year. Spend these next few weeks learning where they are at with their hobbies, clubs and passions as for some pupils, they may have developed or changed course since your last check-in. Showing the children that you haven’t checked out and are still interested just further proves to them that you do truly care about them beyond their time in your class.
Prepare for Transitions: Support students who will be transitioning to the next year group or a different school. Facilitate discussions, share information, and create activities that help students feel prepared and comfortable with the upcoming change. Ease their anxieties and instil confidence drawing upon their reflections from this year. Whatever your format, do your best to communicate with parents and teachers with the key messages, whether that be via documents or facilitating pre-visits. Working with teachers to spend some time in your classroom getting to know the children can be very powerful as they can see how your set up works to support each child.
Clean and Organise: Take the time to clean and organise your classroom, tidying up materials and supplies that won’t be needed until the next school year. Involving pupils in this process can teach responsibility and teamwork while ensuring a fresh start for the next academic year. It helps you out massively by tackling one small thing a day rather than waiting for the mad rush on the last day. Emptying school trays, clearing our lockers, and noting what loose work and where the completed books are ready to be sent home can make it easier on the last day.
Communicate with Parents: Maintain open communication with parents during the final weeks. They are also feeling the year coming to an end and would appreciate any opportunity that helps showcase what their child has achieved thus far. Sports days are a key event that parents love to attend, but plenty of notice is required so try to keep them informed about end-of-year events, important dates or deadlines, and any pertinent information they need to know. Express gratitude for their support throughout the year and do your best where reasonably practicable to give them the personal touch of how well their child has done: this could be via the reports, face-to-face or a small note.
Prioritise Self-Care: Amidst the busyness of the final weeks, remember to prioritise your own well-being. Make time for relaxation, reflection, and rejuvenation to recharge before the summer break. Taking care of yourself ensures you can give your best to your pupils, current and to-come.
Get ahead: Think about what your future self would thank you for. It’s not uncommon for staff to feel the holiday blues after summer and so it can take longer to get back up to the pace school life expects from us. With that in mind, get ahead with planning, trip organisation, stock orders, class layout and displays, so that you can focus on getting back into your stride and establish healthy routines and relationships with your new pupils and colleagues.
Conclusion: As the school year draws to a close, teachers play a pivotal role in creating a meaningful wrap-up for their pupils and parents. This is by no means an exhaustive list, but by reflecting on the journey, setting clear goals, engaging in purposeful activities, and fostering celebrations and transitions, teachers can ensure a successful conclusion to the academic year. With effective communication and self-care, teachers can also find balance and recharge for the well-deserved summer break. Embrace these last few weeks as an opportunity to leave a lasting impression and set the stage for a fresh start in the next academic year.
In my previous post, I discuss the need for change in terms of systems and measures within the workplace that improve validity, efficiency and effectiveness (see Dogma – a call for change). However, in this post, I am discussing the importance of keeping current systems fresh, engaging and refined.
For example, the typical image of a teacher at the front of a class teaching is still good practice in imparting knowledge to the class/audience. This is not a case of dogmatism as it is proven still to be an effective measure and often delivers the intended results. This also links really well to having well established routines that allow cognitive efforts to be on the content rather than the process (e.g. being ready for the learning content in a familiar environment without having to worry about where you sit, class expectations, how to access class resources etc.). However, standing at the front talking at your audience does not always mean it is most effective in transfering knowledge and helping them making meaningful connections with existing knowledge at every teaching opportunity.
The spoken word is ephemeral: Sweller explains that after approximately 30 seconds, your audience will struggle to remember anything else without interaction or alternative stimuli. Anyone who has a basic understanding of cognitive load theory and dual coding will know that accessing both the visual (what you see) and auditory (what you hear) channels whilst ensuring the working memory is not overloaded is crucial for effective learning. Of course, an awareness of the different cognitive effects is also important, for example, transient, redundant etc. (see Inner Drive’s blog for more information, or refer to the research of Sweller, Kirschner and Clark and/or Sweller, van Merrienboer, and Paas for more research),
But, whatever your pedagogical approach is (traditional VS progressive; explicit VS inquiry), carefully chosen variability can aid engagement. The phrase you can lead a horse to water but you can’t make it drink is very prevalent in teaching. You can have all the best intention and lesson design, but if the children aren’t engaged, they won’t drink from your fountain of knowledge. This links greatly to Maslow’s hierarchy of needs, but for the purpose of this blog, I will assume all basic needs are full-filled.
I am a true believer in live-modelling and have seen the power the visualiser can bring into the classroom empowering expert teachers (see Visualiser blog for more details). However, I do recognise the caution that there is a chance it can be death by visualiser, as per powerpoint, if this is the only measure. Teachers must always be alert and question how best is it to impart the knowledge. I know for leaders, it can be very hard to get a developing body of staff at the necessary standard and so more simpler and consistent measures are required.
Because of this, variability is often not spoken about. And quite often, to achieve consistency requires careful planning, a lot of time and monitoring that it can be too risky to change anything at the chance it could undo months/ years of hard-work. However, in my opinion, the key is to achieve consistency in understanding, rather than just practice.
By developing clear Teaching and Learning principles, I have seen a collective understanding of how pupils’ learn from all staff members. They are supported in drawing upon research, each other’s experiences and their understanding of their context to make the best choices for their classroom. As a leader, I truly believe that when I teach or cover a class, I will never be as powerful as if I was their full-time teacher as although I have the research in understanding how pupils’ learn in addition to my experience, I do neither have the contextual details nor relationships to really inform my teaching. With this ‘informed practice’ , teachers are skilled to make the best pedagogical decisions for each lesson that will best support their learning: this is often planned but sometimes, requires on the spot adaptations (see The Invisible Lead Balloon).
Whether it be using different colours, pictures, drawings, taking the children outside, varying your voice, adding a dramatic pause, acting, changing positions (teacher and children), swapping with another teacher, artefacts, starting with a story, or using different stimuli, a small amount of variation can have a great impact.
Variability is rarely spoken about as it can be risky, but it can also be highly effective if used in the right way.
Dogmatism:the tendency to lay down principles as undeniably true, without consideration of evidence or the opinions of others.
It’s no surprise that in many industries (in-fact, in many aspects of life), things happen just because it’s ‘always been this way’. In the education sector, it might be the way playtimes are run, lessons are timetabled, the methods of communications that used etc. In other industries, it might be the way staff are deployed, how performance management is recorded and how budgets are allocated. However, with many people recognising how quickly things have developed over time, it’s no wonder that there are many systems in place that may not be as efficient or as effective as they once were designed to be.
This process I refer to as the negative cycle of subconscious dogmatism. Not always is it negative, however, quite often true solutions or evaluations of systems currently in place are often neglected because it’s ‘always been this way’. Note, I mention subconscious as in my experience, I have often found it not to be an intention of the senior leadership team to keep it the way it is because they want to keep tradition, when in actual fact, they just haven’t invested the time to question.
There’s no doubt that for many new systems and procedures currently in place, there was a clear intended purpose for them at the time they were implemented. For example, as part of teachers’ performance reviews, it was (and still is) typical to observe teaching for 1 hour, 3 times a year. Now for many schools, continuing with a system like this may help in achieving consistency of expectations of staff, teachers already know how it works which provides them with familiarity, alongside supporting leaders’ time management in ensuring 1 hour slots are booked for each member of staff. However, using this example, one could question the validity of this process. If we think about OFSTED, gone are the days of the outstanding lesson that would showcase the teacher’s brilliance in that snapshot; the reason being, it was not a true reflection. They are more interested in seeing the actual impact through pupil voice, books and embedded daily practice. So, why as a school, would we employ this approach?
Thinking about schools, the education offer is far greater than the curriculum: it encompasses pupils’ wellbeing and personal development in conjunction with the academic development. The teaching standards (Part 1 & 2) also refer to this too. In this instance, if measures of monitoring are to be truly fit-for-purpose and reflective of existing practice, then time needs to be set-aside to ensure systems are truly robust and purposeful. Some examples may be daily learning walks for a period of time, observing the teacher teach a selection of subjects (primary school) or year groups (secondary school). Triangulating with data and pupil voice would help inform meaningful discussions between the teacher and their line manager in exploring specific next steps.
In other industries, questioning the efficiency and effectiveness of systems are extremely important to deal with the ever-changing world. It may be that as a leadership team, you explore what’s currently in place and question is there still a need for it. If so, is there a more effective and efficient way? It may also be worth exploring other business models or inviting someone from the outside in to hear their thoughts. Investing in systems & measures that check the validity of your current systems & measures may be more useful.
Don’t just change systems for the sake of change but ask yourself next time, why am I doing this in this particular way? Do I need to do this? And does it need to be done like this?
Group analysis in addition to classes e.g. PP VS Non-PP, SEND, EAL etc.
Files moved to Google Drive for better access (Download all spreadsheets first – do not open as Google Sheets as the links may not work)
As mentioned in my previous blog (Year 6), here is the Excel data sheet, free for your school to use. The sole purpose of this design was to make data input easier for teachers whilst providing all the mock SAT’s data for leaders to analyse over time, as well as a handy overview in prep for the big day!
There are 4 files required (see Downloads at the bottom):
Overview – SLT’s edition;
Reading – Teacher edition;
Maths – Teacher edition;
and GPS – Teacher edition.
SLT’s edition
Scores tab
This will contain all the scores for all the tests across the year.
In this workbook, you will need to input all the pupils’ names, class name or number, KS1 data and additional contextual information e.g. PP, SEND, and EAL. I would suggest arranging the children in alphabetical order for each class just for ease.
The above information will automatically transfer to the Teacher edition workbooks.
Once the Teacher edition workbooks calculate the scaled scores, you will need to input these directly onto this overview sheet – it will calculate the percentages as soon as the data is inputted.
The writing data and the official SATs’ data will also need to be inputted directly onto this sheet. Once you have all the data, in the combined column, you will need to enter the Y (Yes) or N (No) whether they have achieved combined or not; it will then work out the percentages for you. Note – the GDS combined will need to be worked out manually.
Each cell must have a number inputted to calculate all pupils. For example, if you have 30 children in the class and all 30 children are meant to take the test, then even if they were absent, you MUST give them a score. On this overview sheet, input a 0 and this pupil will be used in the calculation.
If you do not want a pupil to be calculated for your percentages, then leave the cell BLANK.
This is useful if one class has 20 children for example, then leave the other 10 cells blank and it will only calculate the percentages for the 20 children you have data for.
You will notice that the headings are colour-coded. Each colour code represents 1 half term’s worth of tests.
The yellow headings stand for predicted. This is where you may wish to update your predictions or targets across the year.
Summary tab
This tab does exactly what it says. It automatically provides the percentages for each subject, of each class, for each term, and the overall cohort percentage. Overall group data has been added here too as well as at the bottom of the SLT Score sheet.
End of Year Final tab
This is for official SATs only. It saved us so much time understanding our results once we inputted our data. You will need to input the scores and Writing data on the Scores sheet and then the overall percentages will be shown on this page.
Teacher edition
Use only Class 1, Class 2, Class 3 and Class 4 tabs
Once the SLT edition form is initially completed, teachers will be able to see the pupils on each of the Reading, Maths and GPS workbooks.
All that is required here is for teachers to input their raw data scores for each part of the Mock SATs e.g. raw score for Arithmetic Paper 1, Reasoning Paper 2 and Reasoning Paper 3, and that’s it! The scaled scores are worked out for you already. These scores now need to be inputted on the SLT overview sheet to be calculated.
For these documents, if you do not want any pupils or cells calculated in the percentages, then leave the cells blank (only the total column should say 0 which will make the scaled score column blank).
I hope this proves useful and saves you and your colleagues some valuable time.
Downloads
Using the link below, download all four files. To download, either click download that has an arrow pointing down located above the files, or highlight (by clicking in the space and dragging the cursor over the four documents) all four excel documents > right click > download.
In your download folders, you should see all four documents (they may be compressed) from here, you will be able to drag this folder where ever you need it and all four documents (still within it) should still correspond when you open them all.
Working in Year 6 can seem daunting for some, especially if it’s your first time. Some feel their subject knowledge isn’t good enough and that the pressure can be too much; others worry about the behaviour that can come with teaching older children. However, from my own experience and with working/ supporting a number of Year 6 teachers in recent years, I can tell you that for most, they couldn’t imagine teaching any other year group.
Working and leading on this year group, it has become somewhat second nature to me, and although there’s always something new, having a good grasp of what’s to come and what you need to be prepared for throughout the year will put you and your team in really good stead. The school academic year 2021/2022 was a triumphant year for my school’s Year 6s, especially since COVID-19, and having robust and strategic measures in place early on was instrumental to our success. For what I hope will be of use to many, I have detailed what I believe to be key points to considered throughout the year:
Classes/ groupings
Lesson planning and subject knowledge
Parent information workshops/ meetings/ trips prep
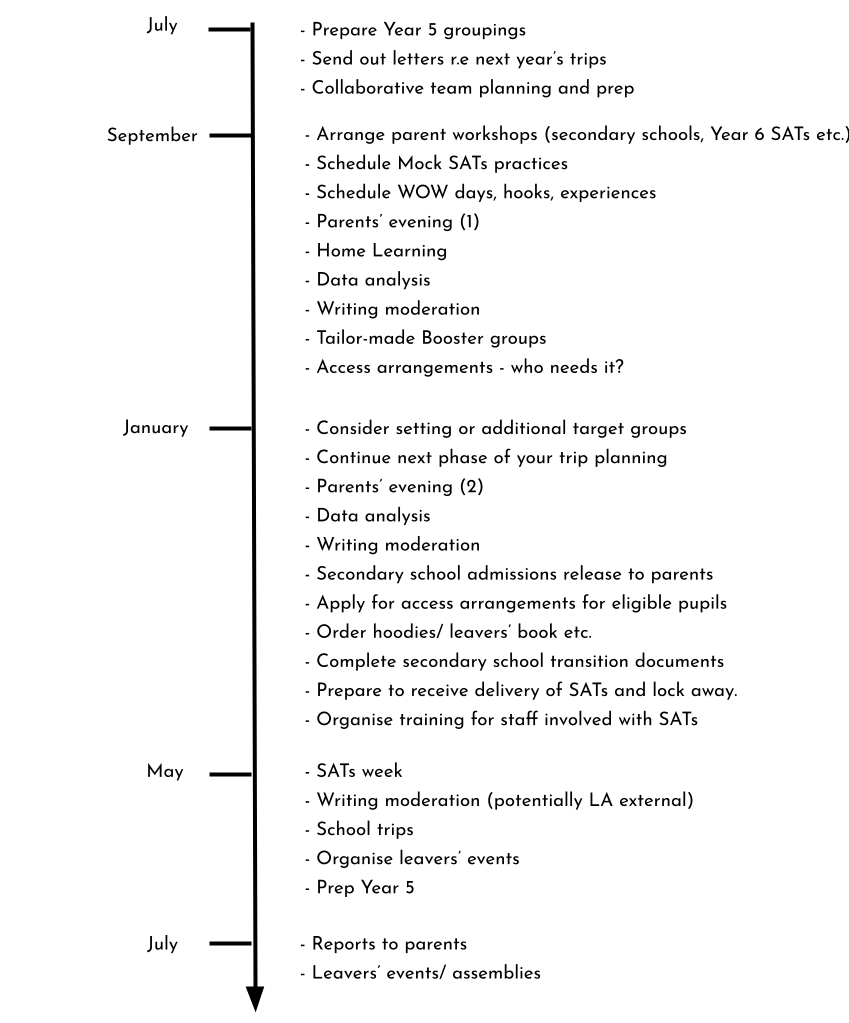
*Scroll to the bottom of the page for a visual timeline
Classes/ groupings
Whether this is something you have control over or not, it is still worth considering for future reference. Depending on school budget, some schools are able to offer an additional class for Year 6: this is extremely helpful as it reduces the adult-to-pupil ratio which allows more time to support those in need. If you have the option to regroup pupils, I would only do so in the best interest of balancing and splitting the needs across the year group to avoid specific ability-heavy classrooms.
What about setting?
Everyone has an opinion on this. I have worked in schools where we have set for core subjects, created base classes that are ability focused, and not set at all. I have also looked into research for this but unfortunately there isn’t really anything substantial to validate one option over the other, so in my experience, I have come to value that mixed ability should be the default choice initially. The reason for this is quite simple – children learn as much from us as they do their peers. In maths, I do advocate setting later on in the year, and for reading, possibly some focused grouping much closer to SATs.
Setting for maths usually happens in Spring term as we would have had two rounds of summative data from Autumn term plus the ongoing formative data that usually highlights this need. Maths is often very teacher-led and allows itself well to scaffolding and challenging similar needs en masse. But with reading, I’d be hesitant to group until a couple of weeks before SATs only with the intention to create a specific targeted focus group which would involve increased adult support in one class.
However, in writing, mixed ability all the way! In order to develop pupils’ vocabulary acquisition and to be confident in being coherent, they need to hear and learn from others. The higher-able pupils always love offering their ideas and actually, this in conjunction with yours, is what is needed to ignite excitement and engagement for all pupils (see my Invisible Lead Balloon blog, my Completing the Circuit blog and my Unboxing Vocabulary blog for some ideas). Then usually once a week/ fortnight (depending on the need), we would create a GD focus group where they can work with like-minded peers to challenge their ideas and syntax further whilst offering some wonderful phrases generated in the individual classrooms – this really does help breathe new life into their work.
So to sum up, I’d recommend mixed ability initially, with setting for maths in Spring term (perhaps a little earlier if needed), some grouping (if required) in reading and scheduled GD focus groups in writing.
Lesson planning and subject knowledge
Like every other teacher, the hard work is in the preparation. Work collaboratively with your team and support one another with planning. Collaborative planning is a must in my opinion as it’s constantly a form of CPD that provides consistency, clarity and sustains high-quality throughout the year group: every child deserves the same educational offer. If you work in a single-form entry, you can still work with other year groups creating a space for challenge and new ideas. Across the year it can get tough so having colleagues to bounce ideas off is extremely helpful and valuable.
Although there is a lot of demand on Reading, Writing, Maths and GPS, it is fundamental to stick to a broad and balanced curriculum. In doing so, it will help offset the pressures and extra efforts required in these core subjects but also allows pupils the opportunities to work on other aspects that they love. Continue to plan in your WOW days, your hooks, experiences and trips but be more mindful to plans these well in advance (especially your residential trip) to ensure the busy weeks that are to come do not distract your efforts into planning these out. Trust me, it does pay off to plan ahead.
Worried about subject knowledge? Well, don’t be. There are plenty of history and geography topics that many of us are expected to teach with little to no prior knowledge of these; yet researching as part of your planning is often all that’s needed – the same with core subjects too. I’d recommend joining teacher forums via social media (Year 5/6 teacher groups on Facebook and Twitter) as there are many like-minded teachers requiring help and/or in-need of some inspiration; it can be a really useful platform. There is often a lot of guidance in CGP books (or other similar workbook providers) as well as guidance in the national curriculum and SATs mark schemes. Also speak with your colleagues and subject leaders too as there is bound to be expertise within your school who can also direct you to useful websites; for example, White Rose premium and SATs companion offers guidance and detailed explanations. If you still require further support then don’t be afraid to branch out to other schools within your Trust or Local Authority as there will be many willing to share and help. I am always willing to help and share my experience and knowledge base without any judgement as I remember what it was like for me, so please ask – it’s for the benefit of the children!
Parent workshops/ meetings/ trips prep
Just as the children are, parents can become anxious with concerns around the pressures and expectations on them and their child, so it is important to address these early on. Depending on how your school communicates with parents will often dictate how you do this but in short, schedule a meeting in the first couple of weeks to let them know what is in store e.g. SATs expectations – the support in place; what key terms means; home-learning opportunities.
Secondary schools tend to have open evenings very early on so although it is not usually the responsibility of primary schools to inform, it is really helpful to let them know how and where they can access secondary school dates. Usually, secondary school admission forms need to be completed by 31st October via the Local Authority in order to be considered for the first round of allocation. As a lot of admissions are now completed online, there may be many families who have limited to no online access. When I worked in a school with high EAL and low socio-economic background, we offered IT support workshops for these families so they could complete the form in school – this was the first year all 120 Year 6 pupils had an admission form submitted.
With parents knowing what to expect thanks to your support, by the time it comes to the first parents’ evening, you will be able to provide specific quantitative data from the mock SATs. By the second parents’ evening, a trend will be evident and so this can be very useful in either reassuring the parent that the support in school and at home is working, or conversely, that more support in school and at home is needed.
In addition to this, if possible, invite parents to workshops for subject-specific support so they can support their child using the same methods and approaches as taught in school.
If you are offering a residential trip, be prepared to factor the planning of this in at the start of the year. Letters should ideally have gone out to the Year 5s in July so parents can begin to save. You will then usually need to plan in a time to explain the residential trip well in advance so they can have any questions answered. From here, you ideally need to get all risk assessments, staffing and itineraries completed as soon as possible as it only gets busier towards the end of Spring.
SATs’ practice
The SATs are only for GPS, Reading and Maths. There are 2 x GPS (Grammar & Punctuation paper and a spelling paper); 1 x reading paper; and 3 x maths papers (Arithmetic Paper 1, Reasoning Paper 2 and Reasoning Paper3). I have found it helpful to do a mock paper each half term as it allows the children to become more familiar with the process, thus being more confident on the day, but also the papers act as a diagnostic measure to inform us of the areas that they need more support with as well as ‘test technique’: knowing how to manage their time, what to do if they are stuck, and offer familiarity to those pupils who have access to additional arrangements. Currently available to download are 2016 Sample, 2016, 2017, 2018, 2019 and 2022 SATs papers. My recommendation would be to schedule a year’s sets of papers to each half term of Autumn 1 & 2 and Spring 1 & 2. I feel this is a good balance to be informative whilst not being overkill. It also means you have leftover questions from the remaining papers that you can use in your planning. There are some suggestions for scheduling them in a particular order as some years were seen to be more difficult than others but that is entirely up to you. Be mindful though, to print, bind/ staple and provide answer booklets for each subject for all pupils is big task so I’d suggest sharing this load with your colleagues at least a week before they’re needed.
To help create a buzz for these papers, we were able to offer the children morning activities and breakfast for each week of mock papers in Spring 1 and 2. The children absolutely loved it! They arrived at 8am and took part in 30 minutes of fun and games with the teachers and their friends. This was great to get all pupils in on time as well as waking the children up and reenergising them for the day. This was then followed by a nutritional breakfast of both hot and cold food. This is something we will continue again and may even offer it in Autumn term too.
Writing – moderation
How you teach writing will be dependent on your school. For my school, we follow a 3-week writing unit. This allows us to build more than sufficient evidence whilst ensuring we have a clear map of all the different genres and purposes of writing. The local authorities are required to moderate a sample of 25% of their schools, which works out that most schools will be externally moderated every 3 – 4 years, so it is worth getting to grips with what is expected and ensure you have a robust overview that ensures your pupils have the opportunities to demonstrate their abilities. If you are selected for external moderation, you are usually notified by the end of May (just before half term) with a morning or afternoon date agreed for the first 3-weeks of June. We were moderated last year (2021/2022) and had all of our judgements agreed with high complements to the standard and range of work. You will need to be familiar with the Teaching Assessment Framework for KS2 (TAF) and refer to this constantly to ensure your pupils have evidence of this. It is important that you schedule moderation windows throughout the year, at least once a half-term. This should involve internal moderation with colleagues and your assessment lead, and inter-school moderations within Trusts and local authorities to ensure your validity of judgements are accurate whilst also offering useful next steps to bring back into the classroom. Being a Local Authority moderator myself for KS1 and KS2, it is extremely useful to have someone familiar with the process so do get in contact with the Local Authority to either become a moderator yourself or to work with someone who is.
Data
Your school may use their own wording when tracking data e.g. On Track; however, the official terminology that is reported to the DfE at the end of the year is whether the child is working pre-key stage (PKS), working towards the expected standard (WTS), working at the expected standard (EXS) or working above the expected standard (GDS).
Raw score refers to the amount of marks the children got correct out of the total possible amount e.g. they managed 25 correct out of 50 in the reading paper. However, without getting too complicated in how it is calculated, the DfE along with the Standards and Testing Agency (STA) convert these raw scores to scaled scores (a score that can be used to compare one test to another taking into consideration the difficulty of the test).
A scaled score of 100 means they have passed the expected standard; a score of 110 means they are working above the expected standard. If you look at the 2022 KS2 scaled score conversion table, you can see that to pass the reading paper, pupils needed to score a minimum of 29 out of 50, yet in 2017 pupils needed 26 out of 50. Note – there is no specific mention that 110 is Greater Depth Standard (GDS); however, most schools tend to treat it as such. These scores are only for the SATs papers; for writing (annually) and science (bi-annually), this is teacher judgement only and so you will need to submit the appropriate code for each pupil via the Primary Assessment Gateway (your Headteacher will have access to this).
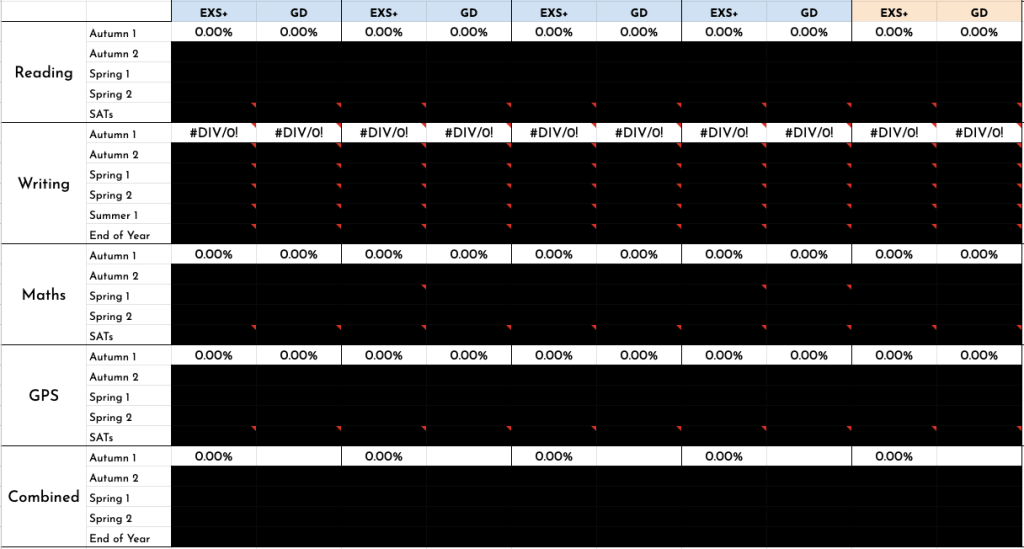
You need a good data tracker to help your analyse trends and identify your next steps to meet your targets. Although we use a data system, I have created a bespoke tracking sheet that calculates percentages and tracks the children’s progress throughout the whole year which has been extremely valuable and insightful. It was also so helpful understanding the official SATs data quickly – after 10 minutes of inputting it in, we had all the percentages for each subject and combined!). If this sounds like something that would be useful to you and your school, then feel free to read more about it and download it here: ‘Year 6 data tracker‘. But whatever tracking system you use, you need it to track each pupil closely at regular intervals as this will greatly inform your groupings (along with your teacher judgement) and any additional interventions/ booster groups you decide to implement later down the line.
KS1 data + Autumn 1 data + Predicted grades + Autumn 2 data and so on.Informed by the data sheet above, it calculates the percentages and then inputs automatically each term’s results and each class’s results, with the final cohort percentages at the end.
Once this is all in place, you will need to know the pupils’ KS1 results for each subject and the cohort’s combined percentage (did they get expected or above in all 3 subjects: maths, reading AND writing?) as this informs you of your progress targets. This is used to inform your school’s targets as they look to improve year-on-year. Many schools utilise the Fischer Family Trust (FFT) website to inform them of their cohort’s targets based on their KS1 data too. From this, you will need to make your predictions of who you suspect will achieve Expected and Greater-Depth and can then monitor throughout the year.
Extended learning opportunities – home learning, interventions and booster groups
Home learning can be a really good way to offer additional practice for pupils whilst also empowering their parents and carers to feel more involved with supporting their child. I have found companies like CGP (who offer activity books) alongside online platforms (like SATs companion) have been really useful for home learning. Online platforms allow the teachers to set homework and track their progress which is great to accompany the efforts in school whilst also offering pupils the comfort in seeing their progress throughout the year. I would certainly recommend looking into offering something for home learning.
Pre- and post-interventions are part of practice and so should very much be part of your teaching and learning culture, for example, during early morning work; however, despite the demands of Year 6, it is imperative that a broad and balanced curriculum is still maintained. Do your very best not to take them out of other subjects, especially the ones they enjoy, as they need a break and we don’t want them resenting coming to school. SATs are important, but pupils’ wellbeing is always first and foremost!
Booster groups can certainly generate debate amongst professionals, but ultimately, if you are supported and happy to offer them, and pupils have the choice to attend, I can’t see any problem with it. The Year 6s love coming to them as they feel like it’s somewhat a taste of secondary school working with different teachers. We allow pupils to bring snacks too to create a positive atmosphere for the sessions. These often start towards the end of Autumn 2 as before- & after-school clubs and continue right up to SATs in May. Most pupils who attended felt a lot more prepared and confident when they took their official SATs.
Preparing for SATs week
SATs are usually in May and last for one week (although there is a two week window for timetable variations). Last year (2021/2022), GPS x 2 was on Monday; Reading on Tuesday; Maths 1 and 2 on Wednesday; and Maths 3 on Thursday. But, for all of this to run smoothly, you must be familiar with what is expected of schools. Below is a list of the essential documentation you will need to know to ensure your school meet the correct deadlines and adhere to the expectations:
Engagement model – pupils working below the level of the national curriculum and not engaging in subject specific study.
The DfE outline the provisions allowed for certain pupils to ensure their specific learning need(s) does not inhibit them in demonstrating their knowledge. Using 2022 Key Stage 2 Access Arrangements Guidance will help you know what arrangements certain pupils are entitled to; your mock practices will allow your pupils and staff, time to become familiar with them.
In terms of administrating the papers, use 2022 Key Stage 2 test administration guidance to ensure the mock SATs papers are carried out as expected for the real thing – this helps to reduce anxiety as pupils become familiar with the process. It is also a great opportunity for adults to know what they can and cannot do in different situations e.g. what happens if a fire alarm goes off.
Throughout the year, there are deadlines for when information needs to be submitted, e.g. the attendance register for your pupils; applying for certain access arrangements etc. So refer to 2022 Key Stage 2 Assessment and reporting arrangements in conjunction with the other documents.
The SATs papers are usually delivered towards the end of April. You must have a lockable cupboard where the papers can be kept to ensure there is no maladministration. The Local Authority do carry out random spot checks of schools to ensure the integrity of the papers are not compromised so be sure to be extra diligent and document any interactions with the papers e.g. receiving the delivery, checking them every so often etc. Only certain members of staff should know and have access to this. Refer to the documentation above and How to keep test materials secure to know how to do this. I recommend printing off a sign in and out sheet so that when the papers are checked periodically to ensure they have not be tampered with, you can record who has checked and when; be sure to have a witness with you every time.
For any pupils working at pre-key stage or anyone who your Headteacher feels should not be taking the SATs, you are unable to disapply them – this will need to be recorded on the Primary Assessment Gateway and parents must be informed. A pupil can take some of the subjects, for example, a pupil could take the Maths test but could be disapplied for the Reading paper; however, they cannot be disapplied from part of a subject. For example, they couldn’t just do the arithmetic paper and then not do the Reasoning papers, they must complete all of the maths papers.
Prior to SATs week, you will also need to arrange the timetable for the week and the staff helping. As long as you complete the exams on the designated days, you should not need to apply for a timetable variation, but all of this is explained in 2022 Key Stage 2 test administration guidance. However, prior to the SATs, all staff involved must have received training in knowing how to administer the papers correctly. I have attached the slides that I have used in the past below – you are welcome to use and adapt for yourselves. Ensure you keep hold of the records that the staff involved have signed to confirm their training.
During the SATs week, it is recommended to invite governors and colleagues from other schools to quality assure the process and ensure all guidelines are followed.
The relief of SATs is over but the pursuit for pupils to be masters of learning and obtain long-term memory continues. Of course, you may still be selected for external moderation so the evidence for writing must continue. If secondary schools haven’t already, they will be requesting transition information for all of your pupils, along with dates to visit the children in-person or on-zoom. Some schools use provide you with different transition documents so give yourself some time to familiarise yourself with what they need; work with your office team and Inclusion team to help as this can be quite a taxing job to do by yourself. If you’re worried about meeting their deadlines, speak with the secondary schools; they’re usually very flexible and understand how busy this time is for primary schools.
This is also the time where behaviour can bubble. It is very common for children to perceive SATs as the end point so be sure not to allow standards to slip. Use secondary schools as the next goal to ensure they are working hard for when they meet teachers on their transition days. Set challenges and competitions each week in the other subjects too to sustain their interest and compensate for the core subject focus earlier on in the year. You may also want to invite external agencies like the local police, community workers, mental health services and others, to remind pupils of what is available to them and what they should remember as they go on to be independent citizens of the community.
While you’re continuing with this, assuming you are working in Year 6 again next year, you will now want to be working closely with the Year 5 team to begin sorting groups and preparing data targets for the September start. It is important that you take the successes from this year and set them in stone but also reflect on how this year could have been better and be sure to set this plan up – you’ll thank yourself later. Alongside this comes the finalisation of leavers’ celebrations.
The residential you have been planning will not be too far away now and hopefully all that earlier preparation has helped. The children and parents also love being able to purchase hoodies and leavers’ books. I’d suggest ordering the hoodies as soon as possible so the children can enjoy wearing them to school in their final term (if permitted in your school). Leavers’ books are also a good way for all teachers to pre-write their messages with space at the end for signatures – this saves a lot of time in the last few days whilst also acting as a wonderful and smart souvenir the children can cherish. We also have a Year 6 production as well as an outdoor extravaganza day later on in Summer 2 (to give them all something else to work towards). This year, we also held a school prom for the Year 6s which they absolutely loved – they all dressed up smart, had lots of photos taken and got to dance their hearts out. By doing this on the last few days, you can reuse a lot of the decoration and balloons for your leavers’ assembly.
The leavers’ assembly was a great way to celebrate the children’s journey with their parents. In addition to the specific prestigious trophies (‘most inspiring’, ‘the reader’, ‘the dancer’ etc., voted for by both adults and children), each pupil received a commemorative gold medal with the school year and name engraved. We had heart-felt messages from the teachers and then finished with a song before heading out for our traditional end-of-school-countdown where the children got to throw their pre-made paper graduation hats in the air. It was a wonderful send off that we will certainly do again.
You’ve got this
Without a doubt, Year 6 is certainly challenging and the stakes are high. However, it is an excellent opportunity to really put your expertise to the test as I am sure you will discover areas of your teaching that you may not have realised you had. You will finish the year having a firm grasp of what the entire primary school journey is leading to which is extremely powerful for your career. But, to compensate some of the challenging days, the glorious opportunity to spend quality time with your pupils towards the end of the year ready for their big send off is truly remarkable; it is a feeling of satisfaction like no other. Embrace your year ahead – you’ve got this!
I get it, and for most reading this, I appreciate I am preaching to the converted. Yet, fascinatingly, I still hear many of my teaching colleagues operating without them despite advocating their effectiveness. I am aware that teaching does not lend itself to just one effective approach but considering the technological alternatives, cost and ease of use, I really advocate for school leaders to consider investing in visualisers for their school. I appreciate some of the barriers to this investment is usually down to school funds but quite often, the pursuit for change can fall under a category of what I like to refer to as education’s subconscious cycle of pedagogical dogma: we continue to do what we do, in the way that we do it, because that’s what we’ve always done! If you’re looking to enhance classroom practice and have not invested in visualisers, I’d strongly recommend doing so.
There are a number of useful blogs that offer strategies advocating the effective use of visualisers. And as much as I see the value in them, my intention is to capture and convey to you the impact we have noticed since incorporating this pedagogical learning aid within my own school setting, highlighting how this has provided teachers with greater flexibility to plan, deliver and address learning needs in conjunction with their own innate and developed awareness of how pupils learn.
At the time of writing, we are currently in our 2nd year of using the visualisers. Previously, we were heavily reliant on slides/ PPT and class whiteboards. When modelling, we would either animate each step (which took a very long time to plan), present the outcome already completed or model on the whiteboard (with our backs to the children and our bodies blocking part of the model as we worked our way across the board). It was excellent for easily organising and sharing images and videos, but quite often, due to a variety of constraints, content was being read from the boards and overpowered by too much useful information that together, was ineffective. Our teachers spent much of their time juggling how to achieve impact whilst being efficient with their time, but yet more often than not, felt somewhat de-skilled as they felt compelled to rely on the screen. Just for the record, none of the above were ever used as excuses and our teachers worked incredibly hard to provide their very best; however, as leaders, surely we could cut planning (workload) time, enhance delivery and empower our skilled practitioners… thus, welcoming the visualiser.
Uses
Let’s start off with the easy bit: what can it be used for? I have listed some of a few that I have used and have seen colleagues use. This list is not exhaustive and there are many more ideas available online; however, for the rest of the blog, I intend to focus more on the impact with the knowledge of how pupils learn, rather than offering just perhaps variability to teaching (which does have merit too).
Drawing – bringing a concept to life (e.g. modelling how Earthquakes cause Tsunamis); how to hold a pencil when shading.
Zooming in and out on models – focusing small before broadening out and vice versa.
Mind mapping – creating links.
Displays – enlarging modelled work from the visualiser for displays, then using it to inform retrieval opportunities (this acts as a useful cue for the first retrieval process – see Retrieval for Learning blog for more info).
Writing – modelling thought processes; collaborative writing.
Editing – generic as well as modelling with specific work.
Celebrating – sharing successes and allowing pupils to take ownership and invite feedback themselves.
Reading – following teacher read; modelling strategies like skimming and scanning; annotating.
Presentation – how to use a ruler, lining work up, underlining key sections.
Zoom meetings – remote learning to model the above; in-class assemblies (adjusting the angle so the children can be seen).
Staff meetings – subject specific examples (Early Maths training) as well as highlighting key documents (the visualiser was excellent in helping me give a brief explanation how Long Term Memory works when delivering staff CPD).
Staff CPD: Explaining how knowledge of Long Term Memory is considered within the curriculum.Writing analysisMaths: Exchanging/ regroupingMaths: Plotting coordinates
This teaching tool allows teachers to maintain full control on how new material is presented and used. With the awareness of Cognitive Load Theory, we have full control to manage the effects, paying particular attention to the modality effect. Through the delivery, teachers can ensure they draw/ model/ write/ annotate only the essentials whilst accompanying it with spoken word. We have the option to capture the key words from our speech and show how it links to what is being presented, ensuring it doesn’t become ephemeral like the rest of our talk.
Live Modelling
Live modelling appears to be extremely effective. Think of a time where you have needed a food recipe, or wanted to create origami, or have watched a Youtube clip for DIY tips. Although reading instructions isn’t impossible, we seem to learn quicker and make greater links from videos/ live modelling; so why not incorporate this into the classroom too?! Being able to use the materials the children will be using helps to reduce the cognitive load for pupils as they make transferrable links between what they have seen to what they are using/doing themselves; for example, teaching Reception children a counting principle like stable-order principle, it is more effective to use the exact printed pieces/ resources that the children will then be using.
Positioning
The visualiser is planted on top of a moveable stand (see link at the bottom to the one we use). Initially, we had it positioned next to the interactive board so that we could resume our normal teaching position; however, upon further exploration around the redundancy effect, modality effect and enhancing our classroom environments, we realised that we were in fact the very distraction to the children’s focus. We model crucial methods and show how key facts link yet our gestures and natural body movements constantly “compete for our pupils’ attention” (McCrea, 2017). So we moved the visualiser to the side of the class and what a difference! Whilst still ensuring all children are facing the front and maintaining concentration, they are now only presented with carefully chosen and specific visual stimuli that they need, accompanied with the auditory support: dual coding.
Feedback
First and foremost, the children love coming up to the visualiser to present their work, like athletes to the podium. In tandem with our positive, supportive culture, the children welcome immediate and specific feedback from both their peers and teachers. It offers a personal touch that all of their peers can access, enhancing that sense of family and belonging where we all can see, promote and celebrate the progress in each other whilst genuinely wanting to help each other. It is wonderful to see.
It allows the teacher to clearly model the content, structure and presentation across everything we expect the children to do; it is particularly useful for non-examples and addressing potential misconceptions before they happen. Being able to zoom in and zoom out allows us to take into account the redundancy effect depending on the focus; for example, addressing incoherence within a sentence, we can zoom in from the whole paragraph onto the sentence in question, removing the extraneous load of the rest of paragraph and enhancing the sentence to the size of the class screen. When modelling the protractor, using a ruler or plotting coordinates, it is excellent to model how to actually mark X on a grid, or how to use the protractor accurately, zooming in and out on the different points. This level of thinking informs our planning as we deeply discuss and model collaboratively what exactly our teaching will look like; not just the content but the specificities of each process for successful learning e.g. moving from “model how to use a protractor” to “Model lining up the centre point, zooming in on 0 on the corners, and following the line markings parallel with the straight line”.
Planning
This brings me nicely onto our planning. Since the visualiser has now become embedded within our daily practice, we now dedicate planning time to discuss collaboratively how we can precisely use the visualiser effectively. As we have managed to reduce the planning demands, there is more time for teachers to now dedicate agreeing and modelling to each other what the method or process of modelling will look like exactly. This not only ensures consistency across the year group but enhances practice as we share and explore more effective and efficient models. The high levels of confidence and expertise of teaching is really evident across the school.
Autonomy
When visualisers were first introduced, although there was some resistance, it was mostly uncertainty around how this should be used and when. This was very indicative of where we were as a teaching collective but also an expected response to new technology being introduced. Yet, through staff meetings, team discussions, colleague-to-colleague support, the benefits of the visualiser was beginning to emerge and travel across school. Then, in conjunction with our CPD around our Teaching & Learning principles where we practiced what we preached (delivering sessions via the visualiser), teachers experienced first-hand the learning aid and thus, could see how the research could be transferred directly into the classroom. We are very much striving for “Informed Teacher Practice”, where teachers, informed by practice and research, have the autonomy to decide how best the curriculum should be delivered to their children; the visualiser is the gift that allows teachers to keep on gifting.
Since then, almost all teachers have said they do not miss the interactive touch boards as they feel they can achieve almost everything through the visualiser when it comes down to modelling. Rather than take my word for it, here are a few testimonials from our staff who have kindly taken the time to express the impact they have witnessed for themselves.
Testimonials
Shelley:
“Just sending over some feedback for the amazing visualisers! I cannot express enough how much impact the visualizer has had within the Art room so far this year, it is simply amazing and for me allows me to teach Art correctly and more in depth.
Without the visualiser the past few years I was having to teach sketching skills and basic art to the children on a whiteboard – as you can imagine is not the correct way, so this is such an amazing step for the children and myself.
Just the other day a child said to me ‘Miss …………. this is my favourite piece of Art!” I asked the child why and she said “it looks amazing!” So I said, “has the visualiser helped?” in which lots of children commented and said how it has helped them improve their Art skills, which is now proving in their amazing art work!
So thank you from me and all the children in Art!”
Amy:
“I can only say I have seen a hugely positive impact from the visualisers since they were introduced. They give the children the opportunity to be able to focus on one thing at a time, instead of watching the adult too. The presentation of my class improved massively last year as they could clearly see what the expectation was, which ensured consistency across the class.”
Michelle:
“It truly doesn’t feel like just a year since we began using the visualizer software. It has already become a well-established part of my teaching style. It has also been a valuable tool that has given me the opportunity to reflect on the impact of the teaching and learning more. When I am in a supporting role, I am able to see the other side of it (what the children are seeing). This has proved highly beneficial as I have picked up on the smallest things like glares on the interactive whiteboards or there being no focus and more specifically that fact that right handers are at a loss when explicitly teaching handwriting and letter formation as their hand covers what the children need to see.”
Yee:
“It’s been very useful, especially with modelling tasks and supporting with explicit teaching.
– love it! :)”
Katy:
“Introducing the visualisers to the classroom has had a huge impact on my teaching, planning and delivery of learning.
When planning, I am always conscious of extraneous load on the children, meaning I do not want to overload countless slides with pointless information. Having the visualiser has worked hand in hand with this theory, ensuring I am utilising it in every aspect of the lesson.
The children have been able to maintain high expectations of presentation in books by mirroring my own ‘visualiser exercise book’ thus reducing room for error. This has had a huge impact when giving feedback as I am able to clearly and explicitly give whole class feedback based on my book analysis.
Additionally, the visualiser has had the largest impact on teaching and learning through modelling. I am able to explicitly model techniques and strategies to aid learning, as well as modelling my thought process and questioning the children/inviting them to participate.
Other ways I have used the visualiser:
Instant verbal feedback;
Using children’s work as a ‘good example’ (promoting self-efficacy);
Worked examples;
Enlarging text;
Science experiments;
Demonstrating handwriting.
Additionally, the children have thoroughly enjoyed using the visualiser themselves. Please see below their testimonies.
David – I love using the visualiser in art because the teacher can show us exactly what to do and what a good example looks like.
Ruby (uses hearing aids) – The visualiser is helpful because if my hearing aids do not work, I lip read but I can also clearly see exactly what I need to do.
Jessica – I think the visualiser is good to show presentation expectations. My presentation has improved because of it.
Izzy – It is helpful to our learning because we can see everything clearly.
Reece – It helps both children and teachers
Patryk – It is fun because in maths we can use it to show our own knowledge. Like when we used the place value counters.
Isabella- It’s good because you can feed back our spelling mistakes so we can correct them.
Ambi – I like doing ‘show and tell’ using the visualiser because then everyone can see what I am showing.”
References:
McCrea, P. (2017) Memorable Teaching: Leveraging memory to build deep and durable learning in the classroom: 2 (High Impact Teaching).
Products
These are the products we use and are very happy with them (there are other alternatives available online):
“Forgetting focuses remembering and fosters learning; remembering generates learning and causes forgetting; learning causes forgetting, begets remembering, and supports new learning.” Bjork (2015)
Our ultimate goal as teaching professionals is for children to acquire all the necessary learning, and more if possible, efficiently and securely. Having an understanding of the theories behind how the working memory works and how we build schema (assimilating and accommodating new learning) allows us to explore the most effective ways for the learner to obtain and consolidate new knowledge.
Daniel Willingham’s memory model provides a brilliant visual representation of how our mind retains and deals with new information; this links with Robert Bjork’s quote above; I understand it as learning causes forgetting, forgetting causes remembering, and remembering causes new learning. This remembering “part” is essential to ensure acquired knowledge can be easily brought back to memory: this is retrieval.
Retrieval strength and storage strength
Bjork (2015) refers to retrieval as a ‘memory modifier’ as using our memories can alter our memories. Think about how retrieving something more frequently than something else would alter the state of both of those items: one being more accessible and usable than the other.
Robert Bjork’s and Elizabeth Bjork’s Theory of disuse (1992) categorises an item in memory into two ‘strengths’: retrieval strength and storage strength. Retrieval strength refers to how quickly and accessible that item is to be recalled; the latter refers to how well that item has been learnt. So you might be thinking about the need to increase retrieval strength and storage strength; however, that is not necessary the case.
Bjork (2015) states that when something is accessed very often, little to no learning takes place. This could be largely down to recency. Therefore, if we use what we know about the benefits of forgetting and the importance of separating opportunities to retrieve through space and time, this will create desirable difficulties, thus, building storage strength which relates to permanent changes in learning.
Retrieval cues
Another consideration when planning retrieval tasks is to think about cues: context and state. Context refers to external cues (like environment and other external factors that supported the encoding of that knowledge) whereas state refers to internal cues (emotional, physical and mental state). Godden & Baddeley (1975) conducted an experiment where two groups had to memorise a series of words, one group being under water and the other on land. When recall took place in a different location (context) from where they had learnt (e.g. the scuba divers recalling on land), recall was poorer. Therefore, it’s worth considering the impact of their setting; for example, learning something in Science but then recalling it in Forest school, and vice versa. State cues could be how you’re feeling at the time of learning, considering your emotional, physical and mental state; therefore, returning to the same physiological and emotional state when a memory was formed can help recall that memory (White, 2003). Goodwin (1995) explains how it is not uncommon to hear stories of drinkers who stash alcohol or money while intoxicated and then can locate the hiding places once being intoxicated again.
Thinking about retrieval
Understanding the importance of prior learning and the pre-requisites is key for new learning to be built upon. Having this awareness better prepares us so that we can plan in specific questions, tests and tasks that activate a child’s prior learning. This can act as a desirable load demanding the individual to resurface the forgotten information, remembering it in more detail, and then applying it to the new learning. With this view, we should be seeing retrieval as ‘retrieval FOR learning’ as opposed to retrieval and learning; and what I mean by this is retrieval being seen as a separate entity, an isolated part of the lesson with no particular or evident links.
Now, in contrary to this, I do understand there is a lot of benefit in retrieving facts that are not linked with the lesson of that day; quite often, the use of ‘last day, last week, last term and last year’ quadrants can be useful in agreeing some kind of spacing algorithm across the school to support forgetting and remembering. However, the dangers following this approach is that this can constrain teachers to neglect many opportunities to retrieve prior learning as the pre-requisites for the day’s new learning intention. And I believe this premise greatly correlates with a strong, well-threaded curriculum.
Let me talk to you about my refined purpose for planning retrieval (aside from the obvious: to strengthen memory).
Figure 1: Retrieval development across a threaded curriculum
Consider the diagram above (Figure 1) as a representation of my thinking. The elongated bar at the bottom represents a year group from September to July; in this instance, let’s say Year 1. Now, during this period, they are taught a new concept (in yellow). If we could just focus on retaining this information, it would be wonderful to be able to spend all of the following year (Year 2) having hour long (just for argument sake) retrieval maths, reading, writing lessons so that learning is well embedded (enhancing the storage strength). However, of course, we need to teach new learning. So the question is, how do we incorporate retrieval (knowing how valuable it is) alongside new learning. This is where careful and meticulous curriculum design comes into play.
Let’s say the yellow box represents the learning of recognise and sort 2-D shapes. Well, for this knowledge to develop, the curriculum needs to consider how will this knowledge in Year 1 be built upon/ aid the new knowledge in Year 2, then develop further into Year 3 and so on. This is the thread of our spiral curriculum. The concept applies to all subjects, like in humanities, what is the thread of the curriculum? If one year group learns about Roman civilisation and then learns about the Great Fire of London, teachers and children may find it difficult to find links (thinking about the surface facts like dates, locations etc.); however, having a number of threads running through the curriculum that centres around a particular theme will help this (e.g. technological development or inspirational leaders), then these threads are what inform what should be retrieved, identifying similarities and differences across other eras (how does the impact of Trajan’s leadership in Rome compare with the indecisiveness of the Lord Mayor during the Great Fire of London); retrieving for learning.
This idea builds upon the children’s prior knowledge, often first retrieving key facts and dates but then requiring them to retrieve deeper meaning about what they know about the impact of say the leadership, thus, then using their working memory to explore how this memory links to new learning; modifying their memory and increasing their storage strength.
So looking at the arrows on Figure 1, a way to consider retrieval is through the following 4 steps (Figure 2) (this has a broad reference to Fiorella’s and Mayer’s Generative Learning SOI model):
Select (facts and/or procedure) Select
Practice Organise
Application (within context) Integrate
Application (across contexts) Integrate
Figure 2: The four stages of retrieval
This allows a good progression for learning to be remembered, forgotten, remembered and then strengthened as they broaden their schema making further and stronger links of meaning.
Here’s an example.
Year 1’s Learning intention: Recognise and sort 2-D shapes
Year 2’s Learning intention: Identify properties and draw 2-D shapes
Once the children have grasped how to recognise and sort 2-D shapes, let’s consult the 4 stages in preparation for Year 2’s learning intention.
1. Select
If it is necessary to recap this surface level, then retrieval questions like “Name this shape,” or “Match the words to the correct shapes” will allow the children to just select from their long term memory.
2. Practice
Perhaps in the previous retrieval they were able to select the information but had low retrieval strength (needed the adult to give further clues), then you may wish to use the retrieval to encourage more practice of retrieving these facts like “Complete the words and then match to the shapes” or “Sort the 2-D shape names into 4 sides vs not 4 sides” (children needing to recall the shape picture and associate it to the written word).
3. Application
Now, for me, this is where the thought around retrieval really takes some further thinking but is extremely valuable because we are now encouraging children to retrieve the same information but to use it to apply to something else. E.g. “Half of the shape is missing, only a corner is showing, what shape could it be” or “Here are some objects (box, Doritos tube, pencil pot etc.), what 2-D shapes can you see on the 3-D objects” or “Thinking of shape names, sort the shapes in alphabetical order, then in order of sides.”
4. Application (across contexts)
This is where we can encourage the children to retrieve the information, but retrieve its deeper meaning as developed in the previous step and that they see how it can be applied elsewhere, making it more secure and adaptable e.g. “Using double sided counters, what expression would make a square or a rectangle,” or “In forest school, use the sticks to create a triangle inside a square,” or “In P.E, dribble with the ball in the shape of a triangle.”
There are certainly links between this step and the concept of reasoning, and perhaps, this is a type of reasoning, but this process requires meticulous thinking around what exactly do they know and how much further we can deepen this learning through proximal transference: a contextual retrieval link that activates this specific part of learning
Conclusion
For your retrieval slots, thinking about questions that retrieve prior learning is of course the whole point, but it is worth giving consideration to see what parts of the learning you are encouraging the children to retrieve, thinking beyond just selecting the information but creating a desirable load that requires children to really thinking deeply about the meaning behind the learning in preparation for the next stage of their new learning. Ultimately, there is far more meaning that we intend to impart through teaching which only a small percentage of it is well and truly understood. By only planning opportunities for pupils to select this surface information means less time to retrieve the depths of meaning and increases more time for learning to be forgotten and become some-what inaccessible.
So for teachers, think about the pre-requisites and prior knowledge they have learnt the year before that needs to be retrieved to strengthen their storage, but after teaching the new learning, subsequently consider the 4 stages of retrieval throughout the rest of the year in preparation for this to be built upon again the following year or the next time you return to that thread.
Additional examples
Initial objective: sequencing numbers
Complete the sequence of numbers.
Complete the 3rd and 5th sequence of numbers.
On a bus timetable, there are a 4 stops. It takes me 5 minutes to get to the stop. What is the latest time I can leave home if there was a 5th stop?
Creating a graph in science, choose appropriate intervals to accommodate the sequence of data.
Initial objective: learning about the order of planets and gas giants
Recap the mnemonic.
Identify the 3rd planet from Earth (away from the Sun); identify the 2nd planet closest to the sun from Neptune.
Which position are the gas giants? Which planets will orbit the sun faster than Saturn?
Learning about forces, use your knowledge of north and south poles on magnets to represent practically the solar system demonstrating the gravitational pull.
Initial objective: long division
Explain the process; or complete division questions.
Divide with 2 digits, doubling the 2 digit divisor each time and noticing what happens with the quotient.
Improving efficiency with the process, focusing on editing and improving the steps from an example e.g. to speed up the division process, work on strengthening multiplication strategies, so rather than only multiplying by 10 and then if not, doing repeated addition to get close to the first expression, children to practise finding 9 lots by multiplying by 10, minus 1, or doubling and halving, or using knowledge of constant ratio to find close multiples of the divisor in a more efficient way.
Represent each step of the long division process through a bar model.
Further reading recommendations
Bjork, R. & Bjork, E. (1992) A new theory of disuse and an old theory of stimulus fluctuation
Bjork, R. (2015) On the symbiosis of remembering, forgetting and learning
Enser, M. & Enser, Z. (2020) Fiorella & Mayer’s Generative Learning in Action (In Action series)
Godden, D. & Baddeley, A. (1975) Context-dependent memory in two natural environments: on land and underwater